A homemade chocolate slab is a solid bar of chocolate (preferably Belgian) full of roasted nuts which can be cracked apart and enjoyed as comfort food.

Our friend JorreVanhemmens has been organising a music festival at his parents’ farm in Pottes for a few years now – Fête Musicale. It’s a unique festival not only because of the local bands that are invited to play, but also because Jorre brews his own special beer for the event.
This year the festival hosted a small market with food, arts and crafts and he invited me to come along with chocolates for people to taste.
I was excited by the idea and quickly set about thinking what I could make. It had to be something suitable for a festival, accessible chocolate that you could get your teeth into and which would be tasty without being too delicate.
And that’s when I had the idea.
HOMEMADE CHOCOLATE SLAB

The great thing about this chocolate slab recipe is that you don’t need too much and that you can personalise it.
You can choose whether you want to make the slabs with dark, milk or white chocolate and depending on your preference, you can use whatever type of nuts you want, whether it’s cashew, hazelnut or almond.
INGREDIENTS
→ Chocolate (dark, milk or white)
→ Lightly roasted nuts (cashew, hazelnut, almonds, …)
TOOLS
→ 3 long rulers (thickness own preference, but thick enough for the nuts)
→ A big bowl
→ Thermometer
→ Baking paper
→ An office knife
HOMEMADE CHOCOLATE SLABS: 10 EASY STEPS
1. MELT THE CHOCOLATE

Melt the chocolate in a bowl on a pot with water on the hob (au-bain-marie).
Make sure you have enough chocolate, because you have to make the entire slab in one go. It’s better to have too much chocolate than not enough because if you have any leftover, you can always use it for more slabs or make something else.
2. CUT THE NUTS AND ROAST THEM

Cut the nuts in bits (or halves) and put them on some baking paper in the oven (160°C). (You can also work with whole nuts if you make your slab thicker.) You want lightly roasted nuts. Our oven is really powerful, so I have to keep an eye on the progress.
You want the nuts to be golden in colour, but make sure they don’t turn brown, because this might give them a burnt taste.
Once they’re lightly roasted, take the nuts out of the oven and let them cool.
3. DECIDE ON SLAB SIZE AND SCATTER THE NUTS

Put two rulers on some baking paper on a marble surface parallel at a distance from each other. You have to ask yourself before you start how many chocolate slabs you want and make a note of how big or small you want to make them.

When the roasted nuts are cooled, spread them equally between the two rulers on the marble surface. Make sure the nuts don’t come up higher than the height of the rulers. You can use your hands to evenly spread them over the baking paper. This is crucial for a smooth chocolate slab.
4. TEMPER THE CHOCOLATE

The melted chocolate has to have the right temperature for using in your homemade chocolate slabs so you will need to temper it first.
Tempering is just about controlling the temperature. Pure dark chocolate needs to be at 31-32°C, milk chocolate at 29-30°C and white chocolate at 28°C. If you don’t control the temperature, then crystals of cocoa butter are produced at different sizes and your chocolate will appear matt and covered in white patches as well as crumbling rather than snapping.
I temper my chocolate on a marble surface, but if you don’t have one of these you can add chocolate drops to your bowl and stir until the temperature goes down (it just takes a bit longer to get to the right temperature that way).
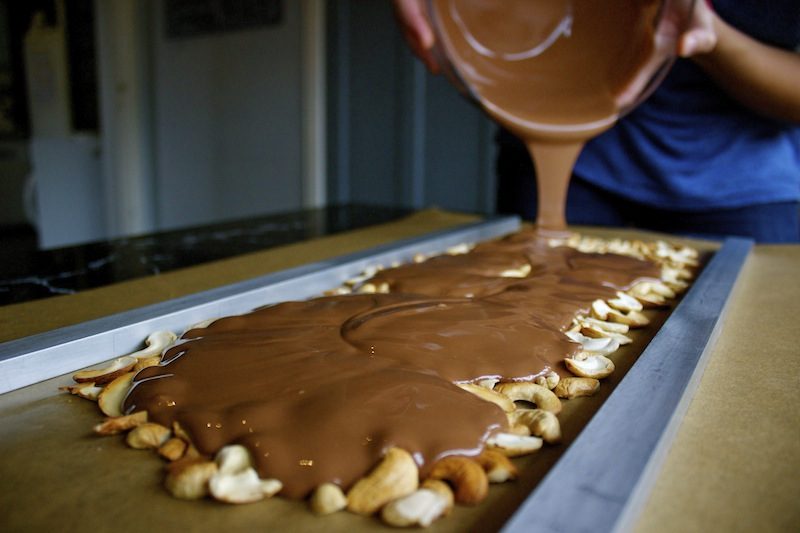
5. POUR THE CHOCOLATE OVER THE NUTS AND SMOOTH OUT THE SLAB

This is probably the trickiest part of the process, but don’t worry – it isn’t that difficult.
Gently pour the tempered chocolate over the nuts, making sure most of the nuts are covered.

Immediately use your third ruler to go back and forth over the nuts and chocolate until the height of the slab is level with the two rulers sitting on the baking paper.
Don’t make the mistake of going back and forth endlessly with your ruler. You have to remember that the chocolate is continuously getting colder and harder.


6. LET THE CHOCOLATE DRY AND REMOVE THE RULERS

When you think your slab looks smooth, put you ruler aside and wait until the slab is nearly dry.
Cut off the two rulers with a sharp knife before the slab becomes hard. If you don’t do it at this stage, you might crack or break the chocolate.

7. COVER WITH BAKING PAPER AND FLIP THE SLAB

When the chocolate is completely dry, put another piece of baking paper on top and flip the chocolate slab so what was the top is now the bottom.
The best way to do this is by taking hold of both pieces of baking paper at the top of your slab and turning the slab by moving forward and up. Do this in one quick swinging movement.
Now you have to wait a little longer until that side of the slab is dry and your full chocolate slab is hard.
8. REMOVE THE BAKING PAPER

You will notice that it is fairly easy to remove the baking paper at this stage. If the baking paper sticks to the chocolate and is showing wet marks, it is better to wait. Be patient, it will result in a more beautiful and smooth homemade chocolate slab.
9. CRACK THE SLAB

After removing the baking paper there is only one job left – my favourite part of the whole process. Break the big chocolate slab into smaller bits. It’s so much fun.
Don’t expect to be able to break it into symmetrical or identical pieces. Who wants that anyway?! Now you have your homemade chocolate slab with whatever chocolate and whatever nuts you want!
10. EAT YOUR HOMEMADE CHOCOLATE SLAB!

Don’t forget this step. After following this chocolate slab recipe, you deserve it.
Enjoy your homemade chocolate slab wherever you decide to eat it, whether it’s in the comfort of your own living room or at a wonderful music festival on a Belgian family farm.
