This Belgian chocolate mousse came about because it was my dad’s birthday Sunday two weeks ago. The Depyperes gathered in our home in West Flanders to break bread and dish out dad’s presents.
Mum was making a special birthday dinner so I thought I could contribute something for dessert made from chocolate. I was so busy with other events at the weekend (including our Irish beer tasting in Diest) that I had only a short window on the Sunday morning to rustle something up.
I’ve been experimenting a lot lately with recipes from friends and family for a homemade Belgian chocolate mousse. My dad loves good chocolate mousse, so the pressure was on!

I wanted to set out the 7 easy steps to making this delicious Belgian chocolate mousse so you can have a go right now! It doesn’t take long and you can do it in the comfort of your own kitchen.
INGREDIENTS
I made double portions. However, I have set out below the recipe for 4 people as most people would make chocolate mousse at home for groups of this size.
As you can see, you don’t need a lot of ingredients to make a delicious Belgian chocolate mousse. You might think the salt seems a strange ingredient, but it can really bring out more of the chocolate flavours and equip your mousse with an extra kick. Try it out – it really works!
If you’ve got a big family like mine or if you are also dealing with big appetites, just multiply everything by two and make double portions as well!

Ingredients | 4 people
→ 125g dark chocolate drops
→ 25ml cream
→ 2 egg yolks
→ 60g fine sugar
→ 3 egg whites
→ a pinch of salt
BELGIAN CHOCOLATE MOUSSE: 7 EASY STEPS
To make it as easy as possible for you to make your Belgian chocolate mousse, I’ve set out the process in 7 easy steps.
1. MEASURE YOUR INGREDIENTS
The first thing you need to do is carefully measure your ingredients.
The texture and taste of your chocolate mousse will change if you use too much of one ingredient or not enough of something else.
If you don’t have chocolate drops, you can also cut bars in small pieces or grate the chocolate.

The cream should be of at least 35-40% fat in order to get a beautiful whipped cream.
Remember, you need 2 egg yolks, but 3 egg whites!
Try to use fine sugar to make sure it dissolves in the mousse.
Be careful with the salt! You can be adventurous, but you still want your chocolate mousse to taste of chocolate!
2. MELT THE CHOCOLATE AND CREAM

Start with measuring the chocolate and the cream. Put them together in a bowl which sits on a pot with hot water on the hob (au-bain-marie) and let the chocolate and cream melt.
Make sure the chocolate doesn’t burn and the temperature is not higher than 45°C. When the chocolate is melted you remove it from the hob and let it cool to body temperature.
3. SEPARATE YOUR EGGS AND BEAT

Separate the egg yolks from the egg whites. It’s extremely important to do this carefully as having any egg yolk in your egg whites will cause problems when you come to whipping the egg whites later.

Put the egg yolks in a bowl and keep your egg whites separate for Step 5.


Beat the egg yolks before you add the sugar.
If you don’t beat the egg yolks, you run the risk of the sugar potentially ‘burning’ the yolks. When your yolks are smooth, add the sugar bit by bit and keep beating the mix with a ‘hand blender’ until you have a light yellow smooth texture.
4. MIX THE CHOCOLATE AND EGG MIX

Next, add the molten chocolate and cream to the mix of yolks and sugar and blend carefully until you have a dark brown smooth mixture.
5. BEAT THE EGG WHITES
Put the egg whites in a bowl and add a little bit of salt.


Beat the egg whites until you have a creamy fluffy white substance which doesn’t come out if you turn your bowl upside down.
Don’t overdo it, because you can break your egg whites and then it is too late.

6. CREATE YOUR CHOCOLATE MOUSSE MIX
Add the fluffy egg whites to the chocolate and cream and blend it under that mix very gently. This is an important moment and will give your chocolate mousse the light fluffy airy texture in mouthfeel. Take your time to do this well.


When you’re finished, cover the chocolate mousse and put it in the fridge for at least two hours. That way it will be more solid when serving but still have the airy light quality that will have it melting in people’s mouths.
7. SERVE AND ENJOY

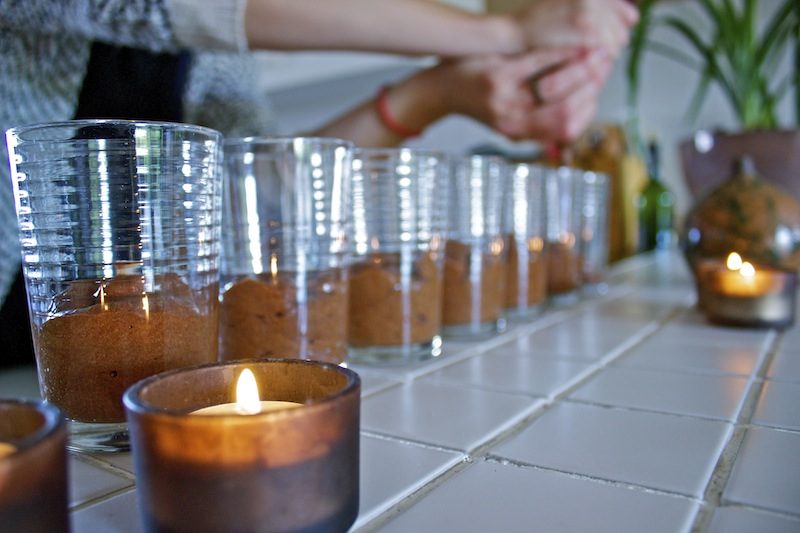
I served the chocolate mousse in small glasses. You can choose to use something else or to serve it with some fruit or ice cream on a plate, but a good chocolate mousse is perfect on its own!


Of course, a wee glass of whiskey goes really well with this Belgian chocolate mousse. Dad brought back a 12 year old Bushmills Distillery Reserve from his recent trip to Ireland to be opened on special occasions and the fruity sherry-cask notes of the whiskey complimented the airy dark chocolate flavours of the mousse.

It was the perfect moment to enjoy this bottle and this classic homely dessert!
